


Transform Your Space with Engineered Timber Flooring
Our premium Engineered Timber Flooring is designed with versatility in mind, offering two installation methods:
-
Direct Stick (Glue-Down) – ideal for stability and longevity.
-
Floating Floor System – quick, easy, and flexible.
Please note: Our elegant Herringbone and Chevron patterns can only be installed using the direct stick method.
Installation Guidance
-
Heavy fixtures: For items such as kitchen islands and cabinetry, always install them directly onto direct stick flooring for a seamless, secure finish.
-
Floating floors: Simply cut and install around heavy objects, allowing the flooring to expand and contract naturally.
Ordering the Right Amount
To ensure a smooth installation, don’t forget to allow extra flooring for cuts and adjustments:
-
Engineered plank styles: Order an additional 10%.
-
Herringbone & Chevron styles: Allow for 15–20% extra to cover detailed cutting and fitment.
Bring timeless style and durability into your home with Imperial Flooring Australia’s Engineered Timber Flooring—where practicality meets elegance.
Comprehensive Guide to Direct Glue Down Engineered Timber Installation
By Imperial Flooring Australia
If you’re looking to elevate your space with elegance and durability, direct glue down engineered timber flooring is an excellent choice. This step-by-step guide will walk you through the process, ensuring a professional and lasting installation.
Preparing for Installation
Before you begin, gather the following tools and materials:
-
Engineered timber flooring
-
Bostik Ultraset HP timber flooring adhesive
-
4.8mm Flat V Bostik Notch Trowel
-
Wakol PU Moisture Barrier
-
Tape measure
-
Mitre saw & table saw
-
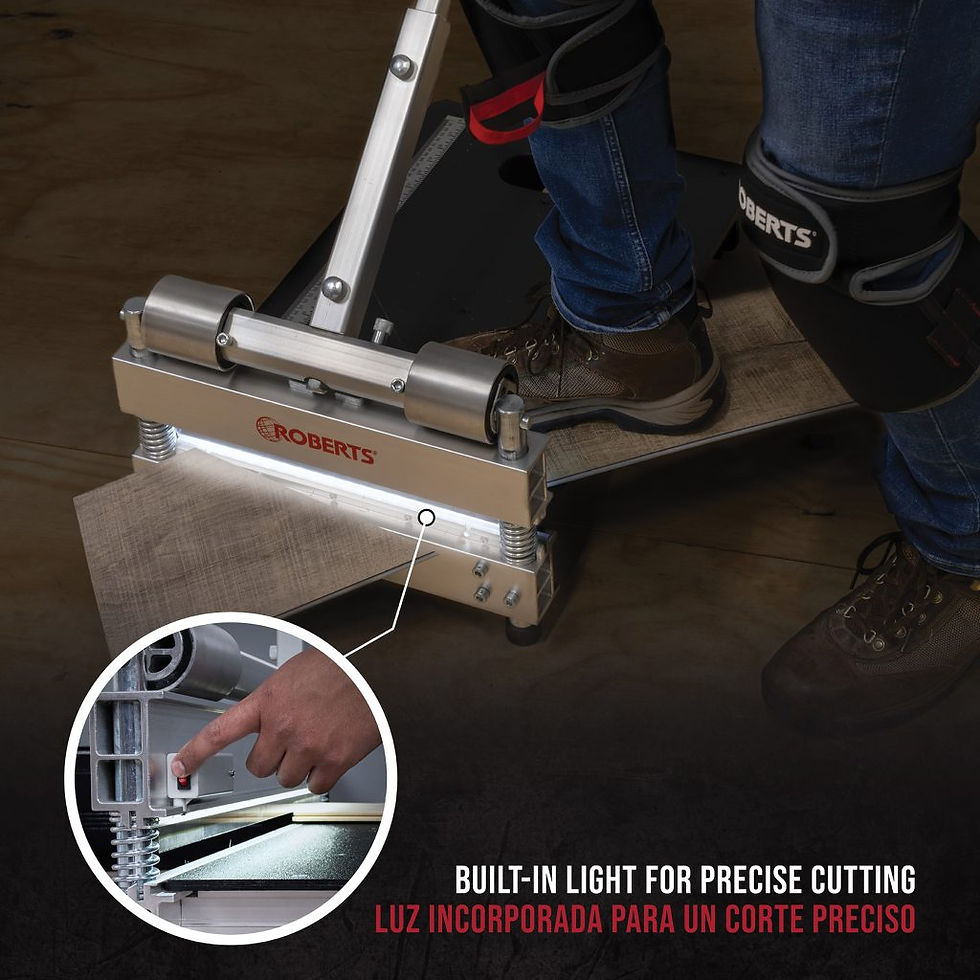
Roberts pulling iron
-
Multi-tool or jamb saw
-
Spacers or wedges
-
Cleaning wipes
-
Vacuum or broom
-
Floor levelling compounds & equipment (if required)
Step 1: Prepare the Subfloor
-
Clean thoroughly – Vacuum or sweep to remove dust and debris. Never wash or wet the subfloor prior to installation.
-
Check for flatness – Australian Standards require no more than 3mm deviation over 3 metres subfloor flatness. Use self-levelling compounds to fill low spots and grind down high areas.
-
Timber or particleboard subfloors – Lightly sand to remove wax coatings, level peaking joins, and eliminate construction residues.
-
Moisture protection – On ground-level or moisture-prone concrete, apply Wakol PU 280 moisture barrier before laying adhesive.
Step 2: Undercut Door Frames
Use an upside-down plank as a guide, then trim door frames with a multi-tool or jamb saw so panels slide neatly underneath for a seamless finish.
Step 3: Plan the Layout
-
Choose a starting wall and snap a chalk or laser line for straightness.
-
Maintain an expansion gap of at least 8mm around all perimeter walls (use spacers or wedges).
-
Install the first row carefully – this will serve as your anchor.
Step 4: Apply the Adhesive
-
Spread adhesive with a 4.8mm V-notch trowel at a 45° angle.
-
Work in manageable sections (approx. 300mm wide), never the entire floor at once.
-
Follow the adhesive manufacturer’s spread rates and drying times.
-
Immediately clean excess adhesive with Bostik handy wipes or a damp cloth, then dry.
-
Tip: Never apply adhesive in broken lines, as this can cause squeaking. Use acetone for any tough adhesive residues left behind
Step 5: Install the Flooring
-
Place the first plank snug against the spacers, tongue side facing outwards.
-
Install subsequent rows by engaging the tongue at a 45° angle, lowering, and sliding lengthwise into place.
-
Ensure each plank is at least 450mm long to avoid clustering.
-
Use a tapping block (never strike planks directly) and a white rubber mallet if needed.
-
Work methodically, ensuring adhesive makes full contact with each plank.
-
Apply light weights or straps if required to keep planks tight while curing.
Step 6: Cut and Fit
-
Measure and cut the last plank in each row, remembering to leave expansion gaps.
-
Avoid continuous uniform patterns – install in a random stagger for a natural look.
Step 7: Finishing Touches
-
Allow flooring to set for 8–12 hours (check adhesive instructions) before walking or placing furniture.
-
For final cleaning, use mineral spirits or acetone sparingly. Avoid flooding with water.
-
Maintain with recommended timber care products such as BONA Floor Care.
-
Remove spacers once adhesive is fully cured.
-
Fill minor gaps with colour-matched filler or cork compound (test first on an offcut).
-
Reinstall skirting boards or trims by attaching to the wall, not the floor.
Important Final Step: Protect Your New Floors
On active building sites, protect your freshly laid floors immediately with THOR Floor Protection matting to prevent unnecessary damage. Visit our webstore for our full range of protective solutions.


Flooring Accessories


Comprehensive Guide to Floating Floor Installation
By Imperial Flooring Australia
Floating installation is a popular method for engineered timber floors, combining speed, durability, and a clean finish. This guide covers the full process, step by step, for Tongue & Groove profile systems (note: clip-lock systems do not require PVA glue).
Step 1: Prepare the Subfloor
-
Clean thoroughly – Sweep or vacuum to remove all dust and debris. Do not wash or wet the subfloor.
-
Check for flatness – The surface must be even and free of humps or dips. 3mm over 3metre flatness is required
-
Moisture barrier – For ground-level concrete slabs, apply a painted-on moisture barrier or install an approved floating floor underlay with integrated vapour film.
-
Underlay – Spread out the underlay over the moisture barrier, or use a combination product that includes vapour protection.
Step 2: Undercut Door Frames
-
Place a plank upside down against the frame to measure the correct height.
-
Trim the frame with a multi-tool cutter or jamb saw so planks can slide neatly underneath for a seamless finish.
Step 3: Start the Installation
-
Always begin with the groove side facing the wall (to avoid tapping the groove side).
-
Place spacers around the room to create an expansion gap of 10mm or more between the flooring and the wall.
-
Lay the first row of boards along the starting wall, with the tongue facing outwards.
Step 4: Stagger the Boards
-
Start the second row with either:
-
The leftover piece from the previous row, or
-
A board at least 450mm shorter or longer than the first board in the previous row.
-
-
Ensure all end joints are staggered by at least 450mm to achieve a strong and natural-looking floor pattern.
Step 5: Apply Adhesive for T+G systems
-
Use only cross-linked PVA wood adhesive – never standard wood glue.
-
Apply glue in a continuous line to the top inside edge of the groove (including end joints).
-
Do not spot glue – floating floors must move as a raft. Spot gluing restricts natural movement and can cause peaking.
-
Wipe away excess adhesive immediately with a clean damp cloth or Bostik handy wipes, followed by a dry cloth.
Step 6: Lay and Join Boards
-
Insert the tongue into the glued groove, press the board into position, and gently tap with a rubber mallet and tapping block (never strike directly).
-
If boards don’t close properly, check glue application – too much adhesive can create a vacuum effect.
-
Continue row by row, ensuring joints close tightly.
Step 7: Install the Final Row
-
The last row will usually need to be trimmed to fit.
-
Measure the gap, subtract 10mm for the expansion space, and cut boards accordingly (do not include the tongue in your measurement).
-
Apply adhesive to the groove, insert boards, and use a spacing bar with a protective block to gently lever them into place.
Step 8: Finishing Steps
-
Allow the adhesive to dry as per the manufacturer’s instructions before walking on the floor.
-
Remove all spacers once the glue has set.
-
Fill any visible gaps with colour-matched filler or cork compound (test on an offcut first).
-
Install skirting boards or scotia by fixing them to the wall, not the floor.
Important Notes
-
Clip-lock systems do not require PVA glue – follow manufacturer-specific instructions.
-
For Tongue & Groove systems, gluing all joins is mandatory.
-
On active building sites, always install floor protection matting to prevent damage. We recommend THOR Floor Protection, available via our webstore.


